Sunday, September 11, 2022

September and the HO SP C-30-1 Caboose ladders are consuming most of my time.

The SP C-30-1 (2, 3) end ladder project is a bit vexing as my skills constructing and soldering the new nickel silver etch ladders have lost a lot over time. They look beautiful still in the etch:


This is a reminder to keep them taped to the 3x5 card being used to protect them when you drill the rung holes. I am using a Starrett drill and #79 drill bit. 

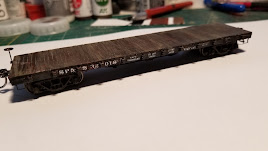
Keeping the ladders straight on the silicon rubber jig I had proposed is not working. This was the second result. The ladder sides are not parallel. Anticipating an attempt to straighten the right side ladder I have not trimmed the upper ladder rung ends completely.  


This caboose lost the ladder and the hand rails and I am bending new ones from brass rod.  

After the SPH&TS convention, I will get back to writing a type of basic instruction manual to be found  on this site in PDF form. I will include the SP standards drawing for the ladders and the C-30-1 handrails in the instructions PDF.  

I plan to use the Plastic Freight Car Model Builders group on groups.io for a discussion topic where we can share methods and help building the ladders. I own that group and can both moderate and not step on the toes of any other group.  (The Walthers SP C-30-1 was a plastic model...my justification.)

The initial distribution of the ladder etches for a $5.00 contribution for each etch will be at the SP Historical and Technical Society convention in Modesto, September 14-18, 2022. Any remaining ladder etches will be distributed at the September 25, 2022 NMRA Coast Division meeting.  If there are remaining etches after the NMRA meet distribution, I will let the Espee.groups.io forum know how to obtain them.

Note that the $5,00 contribution just about covers my costs for having a professional etch designer draw the etch and have a sheet of 72 etches made as a single sheet in the UK. We could not find a North American etcher for small projects like this. By going to the UK we used an etcher who is familiar with model trains and making etches out of nickel silver which has become the preferred UK material for scratch building locomotives.   

I have made arrangements with the designer/vendor of etched kits who helped me with this project as a personally funded commission to order and carry the ladders in the future through their online store so additional ladders will be available with me out of the picture. 


More on this blogsite and https://plasticfreightcarbuiilders.groups.io to come. 

Thursday, August 11, 2022

Bloggers Block Unleashed a bit for July and August and related Modelers Block Too

Another month has gone by and I have little to show for it.  Now the dog days of July have extended into mid-August. 

A few minor adjustments to the station area have been made. 

A hedge now disguises the foundation of the Section house. A new pair of Oxford 1950's passenger cars have been added to the congestion around the back of the freight house.  Otherwise not a wheel has turned on the engine service tracks or yard tracks of Port Costa. 

The westbound mainline trackage around the curve at the west end of the layout has been tentatively laid out and tested with hand pushed freight cars. It is not yet powered.  The layout for the turnouts for the crossover between the eastbound and westbound mains has been also laid out at the far left of the photo.  The radius is a little tight at about 27" but what's a poor boy with only and 14 foot long layout to do.  And the curved ramp from yard level to mainline level trackage works. 

On the freight car building front, I have finally completed the painting and decaling of the UP A-50-16 automobile car from an early 2000's Trix RTR version. National Scale Car formerly Speedwitch decals were used to correct the incorrect Trix all yellow scheme and other lettering issues.  The paint used is a base Taimiya Red Oxide primer with a hand brushed mix of 3 parts Vallejo 70.982 Cavalry Brown and 1 part 70.953 flat Yellow. Pledge Floor Gloss was brushed on the decal areas and then Tamiya Clear Flat spray used to seal and return a flat finish. 

The A-50-16 is the obvious UP car in the above photo. The floor and underframe are still incomplete as I have been unable to locate a plan or photo that shows the very prominent Evans loader chain storage cylinders that protrude below the sill line.  

I am awaiting the delivery of a nickel silver sheet of 72 sets of etched the distinctive SP C-30-x caboose end platform ladders. I hope to have these available at my cost reimbursement price ( estimated at about $5) at the SPH&TS convention in Modesto September 14-18.  I have been practicing assembly of the ladders using the UP brass ladder set I received earlier in the year from Bill Lugg of the UP modelers group. Bill helped me get in touch with Bill Meridith of Leadville Designs who has handled the design and production of the ladders as a custom etch.  If there is sufficient demand I will fund the production of additional etch sheets (72 ladder sets per sheet.) 

This is the etch which shows the two part ladders that were bolted through a flattened section of the end handrails.  These are intended as replacements for the ladders on the Walther's C-30-1 model which tend to break over time. After soldering buyer supplied .020 brass rod ladder rungs in place they can be attached with canopy glue to the existing Walthers hand rails if they are intact.  I am also working on how to build new hand rails if they are broken as are the hand rails on one of my Walther's C-30-1 cabooses. 

More on this once the etch arrives. 

The change to of at least two of my active steam locomotives control from DCC decoders to LocoFi WiFi control is still on hold as LocoFi has not completed the and released the Android app upgrade with steam locomotive type cab controls and wav files for steam exhaust, bells and whistles.   I am also not particularly fond of using the Amazon Fire mini-tablet for the Android app and may change it over to my old Galaxy S8 now that I have bought a Pixel 6 

I guess that's all for now folks.... 


Tuesday, July 12, 2022

This post should be little noted nor long remembered.

I have not touched the layout or any motive power projects in at least 40 days.  I have had health issues that have taken much of my attention and strength from April through into July. No Covid but other debilitating maladies that are partly driven by aging.  

I have looked at the scenery and trackage every day but have had no impetus to work on any of the 30 or so projects that I have started or contemplated. 

The addition of LocoFi to the two active plastic steam engines has been stalled over how to add a Keep Alive to the wiring flow between the rail  pickups on the engine and tender and the LocoFi receiver. 

The best I efforts I seem to have any drive for are freight car projects such as were detailed in my last post https://srandsp.blogspot.com/2022/06/here-it-is-middle-of-june-and-i-finally.html . I have another project for repainting and adding a new floor and underframe to a Trix RTR UP class A-50-16 double door automobile/box car.  This too has stalled as I have been unable to find the definitive brake gear arrangement and locations of the 12 chain cylinders from the Evans loader system that are visible below the car on most photos of the A-50-16 prior to or in the modeling period 1950-54. 

I do have one other project which I have been pursuing for the last several months and is now into the actual production stage.  Early this year I became interested in the efforts of a group of UP modelers to obtain prototypically accurate replacement ladders for the UP CA-1 cabooses made by Walthers. I actually ordered one and have worked on soldering it together although I have not completed it. 

This lead me to Bill Lugg. the UP modeler who created the UP ladder project.  Bill helped me find a US based etcher and designer, Bill Meridith of Leadville Designs,  who was able to take the photos of the SP Common Standard design drawings for the C-30-1 caboose and create a brass etching design for the HO version.  I have just paid for that design work and the initial sheet is going to the etcher today or tomorrow.  The full etch sheet has 72 pairs of ladder styles (side rails).  This is what the artwork for an individual etch looks like:


I The etch has all the holes for the ladder rungs which must be cut from .011" brass wire to be supplied by the modeler. The ladder styles etch is .003 thick. 

I have had the etch design work reviewed by Tony Thompson (the SP freight car guru) to get a second opinion and he agreed this etch would be useful for accurately replacing the Walthers caboose ladders. In the past I have built brass wire caboose end railings. 

These ladder etches are in two parts as the bottom rung and the upper part of the ladder with 3 rungs were separate. These were bolted together through a flattened portion of the end rail. Tabs to be bent for the mountings on the deck, bottom and top of the rail and the roof are included in the etch. 


I will have to look at a soldering jig and instructions to build brass rod handrails for the replacement of the old Walthers SP C-30-1 caboose ladders. 

This is the Common Standard design drawing for the C-30-1 on which the etch is based, It was used for production of the C-30-1 possibly earlier wood cabooses. The attachment plate for attaching the ladder to the edge of the roof shown in the drawing was not included. a piece of brass or even pieces of plastic angle could be used to replicate that feature. 


This has taken a bit of mental energy. I was originally hoping an 3D print would be good for a replacement but the ladder thickness would have to be significantly overscale to provide sufficient robustness. 

I hope to have the first sheet and a built up sample by the Southern Pacific Historical and Technical Society convention in mid-September.  I think I can find someone with an e-store to handle any subsequent distribution as I really do not want to be in the mail order business.   I am looking to just recover my costs if possible and have maybe 5-6 etches for my own needs.  


Tuesday, June 14, 2022

Here it is the middle of June and I finally blog Again

This should be the final blog about the construction of the Tichy Pittsburg and Lake Erie rebuilt USRA 40 foot 50 ton capacity box car. I am finally complete to the point of diminishing returns for doing any more. I could have added air hoses and a Carmer lever uncoupler but that would take me weeks at my current pace.  I have Yarmouth Carmer lever etchings but the attachment is quite fiddly. Ask long as I am leaving the coupler trip pin on the couplers an air hose connection would sort of look redundant.  


The object attached to the sill just to the left of the door on this side only is a NYC cover for the AB valve. It is fairly common on 1950's NYC system box cars. I have not seen it on any other roads. 

Nearly everything added to the model came from Tichy although not in the kit. The grab irons are Tichy 18 inch drop style and the sill steps are from a separate set. The NYC decals are from National Scale Car as are the chalk mark decals. 

The paint process started with a Tamiya grey primer coat that was used in construction.  When I was satisfied with the boxcar's body I used the Tamiya red oxide primer as the base box car read coat. The car was then decaled.  I then hand brushed diluted wash coats of Vallejo Panzer Aces #302 Dark Rust until it reached a dirty dark color representative of steam era freight cars. The running board was washed with Vallejo 71.121 Light Gull Grey to achieve more of a weathered wood effect. Highlights to the running board were added with diluted Vallejo Panzer Aces #310 Old Wood. I used Vallejo's airbrush thinner to dilute the paint instead of water. 

The trucks were a bit of a problem to find. There are lots of versions of Andrews 50 Ton trucks in HO. But the closest match to the prototype is a now out of production Proto2000 truck. I managed to locate a 2 pair on eBay at a reasonable price (less than new Tahoe trucks.) It was fortunate I bought 2 pair as the side frame broke off one truck while testing to see if Tangent Code 88 wheel sets would fit.  In the end they didn't as the axel was a bit loose in the Proto2000 trucks and I went back to using the wider wheelsets that came with the truck.

The car is not quite correct as there was a significant error in placement of the reporting marks on the side shown. The previous blog post covered some of the problems of construction. But now It is ready to be shown publicly. If my mojo is right I will take it to our local RPM meet, the Bay Area Prototype Modelers meet this Saturday in Richmond, California. I just have to type up a description.

Note on the photo. I am working with my new phone camera on a Pixel 6. I am also working on modifying the color saturation of photos that I am publishing.  

This is a builders photo of the original rebuild fresh out of the shop as it was originally lettered for the PMcK&Y. It was re-liveried for the P&LE and New York Central System about 1940. 

Photo from the NYC Historical Society Collection

As Porky Pig would say at the end of a Walter Lanz Cartoon film....Thaaats Aaalll Folks


Saturday, May 7, 2022

Port Costa Layout in Stasis for April 2022

Nothing much has happened on any layout improvement projects for the last 6 weeks.  Four of those weeks I have been fighting a combination of sinusitis and bronchitis that has left me mostly unmotivated. 

I have been pecking at a project to build a Tichy Rebuilt USRA boxcar following the closest prototype to the kit, a PMCK&Y/P&LE/NYC 50 Ton car.  

This has been a bit frustrating as the kit requires 36 separate grab irons mounted in 72 #78 drilled holes. In the process I have gone through at least 12 #78 drill bits. But I am finally done with that phase.  I have 72 3/4 " NBW castings from a Grandt Line set to cut off and mount above the grab iron holes. 

I have completed building the underframe and mounting the AB brake parts as far as I will go (I don't do the detail piping.) The trucks are Proto 2000 Andrews trucks and Kadee 158 couplers in narrow draft gear boxes. 

I have modified the Youngstown 1930's style doors to follow the Richard Hendrickson 1990's MRJ articles. The Speedwitch kit for the correct doors is no longer available. Assembly, brake end detail and other body details still to go before painting and decaling.  


That's all for now.  I am focused on this kit and then another Tichy kit for an 1943 52 Foot War Emergency gondola.  I like building car kits but for now I will in future stay away from freight cars that require grabirons instead of ladders on the ends. 


Tuesday, March 22, 2022

You Didn't Miss Me at All, Did You...

Well, after not publishing anything for a while, I decided to write up what I have been working on.

First, the turntable project has been given a lot of thought but not much action. The pit issue may have been resolved when I followed up on a method used by Bill Schneider of Rapido in a presentation he made on his OW&N layout on a Hindsight 2020 Zoom clinic. He used a 10 inch MDF speaker ring with bezel mounting spacer recessed.  So I ordered a pair (they only came in pairs) for $18 from Amazon and have been playing around at how to finish the pit ever since.  The 10 inch inside dimension diameter scales out to 73 feet instead of the 70 foot for the Port Costa turntable. But the Banta model of the Port Costa roundhouse track spacing was built to use the 75 foot Diamond Scale turntable so I am closer to that and will have to fudge less.

These is a photo of an earlier 70 foot turntable bridge attempt being used to play around with the speaker ring as a turntable pit:


The white plastic circular insert covering the bezel is an attempt to build out a larger inside ring for the turntable support rail.  A new scratchbuilt bridge will have to be rebuilt. I bought a Sterling cast pot metal turntable kit a several years ago for a much deeper D&RGW prototype when I first started Port Costa. The main bridge support seen at the center of the second photo may yet be used. 

A few weeks ago I figured out I needed some different Peco Code 83 turnouts to make the SP mainline track plan at the west end of the layout work.  These have arrived and I have just fitted them into the west end curve. This morning I wired them and tested them with both locomotives and some freight cars. 

There is a short ramped section on a curve (ouch) to the level of the mainline trackage. Thus far I have tested the two Alco switchers and the M-4 2-6-0 and the three work fine over this bit of nasty trackage. It is a lead off the mainline into the Port Costa yard and engine stabling area so no passenger engines or cars are expected to traverse the sharp 20 inch curve on a grade. Right now bits of a plastic wedge are being used to support the grade.  This area "off scene" and is not going to be "scenicked" but I do want a more resilient support for the trackage.


The mogul is sitting on the Eastbound SP main just before a right hand curve turnout.  The mainline curve continues into another right hand curve turnout and left hand #6 forming a crossover to the Westbound main. Beyond that is a siding along the mains next to the Carquinez strait and some stub trackage where the old ferry terminal to Benicia used to be located. The foreground will be occupied by the hill with the water tank. 

For the turnout into the compact storage and staging freight yard I had to use a 18"/20" radius left hand Peco Set Track turnout. Not elegant but it works. I did some shimming to adjust for the Code 83 to Code 100 height transition and then back to Cod3 83. 

You can't see it well with the low resolution but the metal pencil shaped object is a thin Xacto knife holder with a Proxa brush dental cleaner that was discussed recently on the Model Railroad Hobbyist forum as an uncoupler tool for Kadee couplers.  I found a pack of the brushes on sale at a Safeway and tried it out. It actually works separating the cars with minimal movement or hand intervention.


January 2022 Layout Progress

I left this in draft since January 30. No wonder I have nobody reading this blog.

Well  basically, there has been little progress on the layout in the last few months. I did some design work on the turntable pit and bridge but little has happened to the layout which remains the same. 

Note the lineup of steam locomotives on the service track (water/bunker oil.) I am still waiting for the Owl Mountain Harriman Stand-In parts to add to the lineup. I have another Bachmann 2-8-0 to convert and parts to fix the second Mehano M-4. I have little hopes for another brass C-9 or C-10 as the only ones coming to the market lately have been unpainted 1970's models that would require complete rebuilding to work in a DCC/LocoFi control environment. 
I have yet to fix the roof on the section house or do anything better with the trees and ground cover. 

On the control experimental side, the pre-ordered LocoFi new Gen 3 chips that will be able to support steam sound and control features have arrived. I am waiting for some better information on new developments in stay alive/products before performing any more conversions. One thing that has happened is I have found how easy it is to build and load sound packages for the LocoFi  control module.


Thursday, January 13, 2022

Thaaats All Folks...

I have been very remiss in ignoring this blog. I can't promise to better as I seem to be already spending an inordinate amount of time at the PC and doing very little modeling.  Almost nothing has changed on the layout. I can't promise much more for 2022. 

This is the only freight car project in the last 3 months:


It took me 3 months to finish this SP&S 40' flat car.  I found out the Tichy flatcar kit which cost me all of $8.50 was identical to the 50 AC&F cars SP&S purchased in 1924.  I have always liked that railroad and lived in my youth in all the three cities of its name. I have 1960's memories of the SP&S ALCO FA and FB unit lashups crossing the Spokane river bridges and the tall viaduct over the dry valley southwest of Spokane.

I modified the kit to represent the early 1950's with AB brakes. I had Tichy Andrews trucks and was given some non-public good color photos of the cars from the 1960's when still in revenue service for lumber loads. The problem that led to the lengthy build time was finding decals for the model.  Champ made a decal set for this specific car with 7 road names but did not include SP&S in road names (eastern/midwestern bias?)  I tried using the Speedwitch SP&S boxcar set but the reporting marks were too large. I wound up buying a RR roman letters set from Microscale to piece it together but had to pay for $20 minimum order (3 sets of decals.) I finally did get from eBay the Champ Tichy flat car set but all the weight and other small lettering was in block gothic. I used it anyway as by that time I realized it was never going to be a contest quality model. 

Interestingly the SP&S rated the car at 40 ton capacity rather than the 50 tons on the Champ decal set.    I must have spent over $40 on decals for the $8.50 car. 

The end result is not a closeup detail model but a 1 foot model. With Moloco .088 metal wheels and Kadee #158 couplers the weight is not too light. I am trying to adapt the Owl Mountain lumber load kits to this flat car. It looks like I will have to use the 9' wide lumber stacks rather than the smaller lumber as the Tichy flat car deck is a full 9 feet wide with no overhang unlike the OM SP F-50 flat car decks which are 8.5 feet wide but overhang the side sills. 

I am back looking at the design of the Port Costa turntable pit and trying to figure out how to build it. 

Thaaat's all folks....(remember Porky Pig at the end of Walter Lanz cartoons...)